We’re continuing to write a series of guides for our NetSuite customers, providing them with hints and tips all designed to make their lives easier with regards to the use of NetSuite. This month’s guide is all about setting up KPI scorecards, so that you can see and compare the information that is important to you at a glance.
In a previous guide “Understanding the dashboards”, we explained how to add KPI portlets to your dashboards, and in “Creating custom KPIs” we explained how to set up custom KPIs to be used alongside the standard ones provided by NetSuite.
However, this can be taken a step further by setting up KPI scorecards. These offer many choices for the calculation and display of KPI data and can provide complex comparisons among multiple KPIs over multiple date ranges or accounting periods. They can also include Excel-like formulas with KPIs and functions in their expressions.
Read on to find out how to set these up, how to edit them, and how to add them to your dashboards.
1. Go to Customisation > Centres and Tabs > KPI Scorecards > New
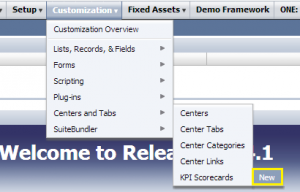
Please note: If this menu option is not available, the KPI Scorecards feature may not be enabled, or you may not have permission to create scorecards. Check with your account administrator to ensure you have the KPI Scorecards permission.
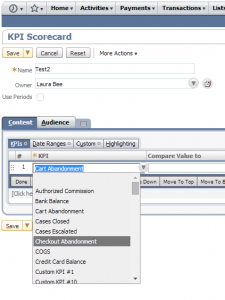
2. At the top of the page, enter the basic scorecard information.
3. On the KPIs subtab of the Content tab, you can add KPIs and define their comparisons, and add formulas and define formula expressions:
____________________________
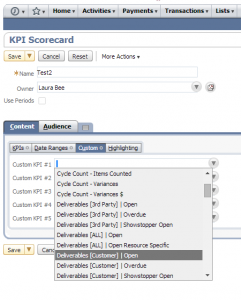
Note: Only saved searches with a date field defined under “Available Filters” are available for use as custom KPIs in scorecards.
____________________________

In this popup, you can:
a. Select from the Function list to add functions to the formula.
b. Select from the KPIs dropdown to add KPI IDs to the formula.
c. Edit the formula directly in the Formula field.
When you have finished entering the expression, click Save.
Note: Only saved searches with a date field defined under “Available Filters” are available for use as custom KPIs in scorecards.
____________________________
Tip: After you have entered KPIs and formulas, you can reorder them by dragging and dropping or using the move buttons (you must select the line first).
4. On the Date Ranges subtab of the Content tab, you can define multiple date ranges (or periods). These date ranges apply to all of your scorecard data. After you have entered date ranges, you can reorder them by dragging and dropping or using the Move buttons (you must select the line first).
5. On the Highlighting subtab of the Content tab, you can highlight options to make results more visible in KPI Scorecard portlets. For example, if a value goes over a certain threshold.
6. On the Audience tab, you can define who has access to your scorecard, meaning who can put it in their KPI Scorecard portlet. You can base this definition on roles, departments, subsidiaries, groups, employees, or partners.
7. Click Save.
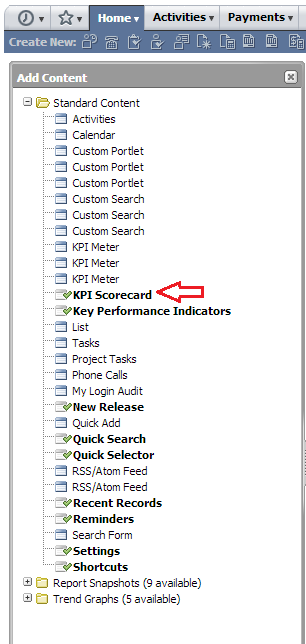
1. Now that you have created your scorecard, you can add it to your dashboard in the usual way: Select ‘Personalize Dashboard’ in the top right. An ‘Add content’ box will then appear on the left.
2. Next, select ‘KPI Scorecard’ and this will add the scorecard to your dashboard. Please note, the KPI scorecard feature must be enabled for KPI scorecard to appear in the list.
3. Hover over the down arrow on the top right of the new box and click ‘Set Up’.
4. Select the relevant scorecard from the drop down list, and choose whether you would like to restrict the scorecard to your dashboard only, or if you would like to share it.
5. Choose the orientation and decide if you would like to show a graph trend icon or a date row.
6. Click Save.
If you own a KPI scorecard, you can make changes to it. To open a custom KPI scorecard, you can:
To customise a prebuilt NetSuite KPI scorecard, open it and make changes, then save it with a different name. To open a prebuilt KPI scorecard, you can:
If you would like to learn more about how you can use NetSuite features such as KPI scorecards to give you a better insight into your business’ activities, please don’t hesitate to get in touch with one of our team of experts.
Feel free to share this guide with your colleagues or comment below.
if you’re looking for some new business management software, one of the options that you’re sure to come across during your search is Certinia (formerly FinancialForce). Here we go through some of the key differences between Certinia and NetSuite.
Intrigued by the possible efficiency savings of integrating Salesforce with NetSuite? Read our guide to find out what integration involves & the benefits it can bring for your business.
If your business is using Xero and you're are wondering if it’s time to streamline your financial management and implement NetSuite, read this post! We cover the advantages and disadvantages of swapping to NetSuite or sticking with Xero.
For our latest webinar, we’ve teamed up with Abacum to showcase how finance teams are moving from historical reporters to strategic advisors using an AI-native FP&A platform built for 2026.
If you’re considering improving your business operations by implementing NetSuite, you could benefit from being supported by a NetSuite partner. Here are 7 reasons why...
In this post, we'll explore some of the signs that it's time for your business to make the move to NetSuite, as well as what improvements you can expect to see. We'll also cover how to make sure the process is as smooth as possible once it begins.